

Ever saw a clothing piece in the Roblox marketplace and thought that it was overpriced? Which also made you think, you can do a better job. No need to hold back now, as here we have brought you the step-by-step guide on how to make a Shirt in Roblox. Going forward, we have added the requirements, dos, and don’ts, while uploading your unique clothing item.
How to Create a Shirt in Roblox
The first you need to know is that it costs you 10 Robux to upload and sell classic clothing in the Roblox marketplace. If you are short of it, check our Robux section and get them. Now, the next thing you need is an image editing software. You don’t need to purchase an expensive one even GIMP is enough.
- Google search for the Transparent Roblox Shirt Template.
- You will find plenty even on Reddit and Pinterest but only download the one with the torso and arms transparent.
- Open the editing software and add the image.
- Use the shape tool and add an oval for the neck area.
- Now, while leaving the neck, paint, fill, add pattern, word, or anything you want within the shirt template.
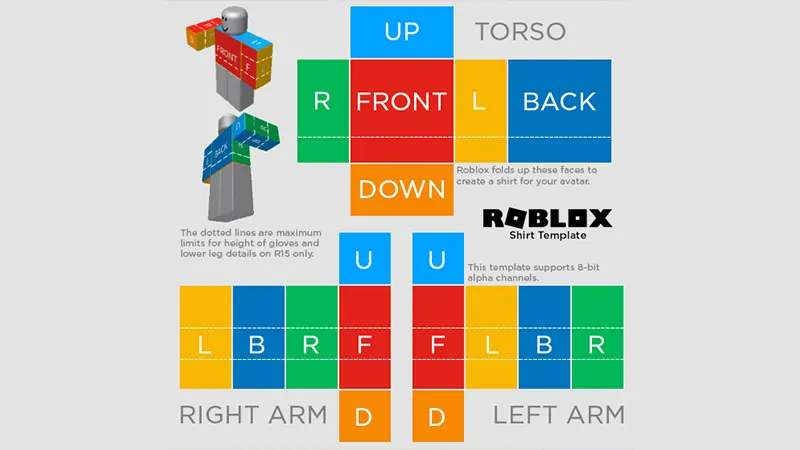
- As you can see in the picture, this is an official shirt template by Roblox. All you need to do is keep the design inside those color boxes of arms and torso. However, don’t use this image, as it isn’t transparent.
- Once you are done, save the image in PNG format.
- Now, if you want to check how it looks, use the Avatar tab of the Roblox Studio.
- Using Rig Builder, add Dummy and then insert the Shirt to test.
How to Upload Shirt
- After you have made sure the design is perfect, open the Roblox desktop site.
- Log in and select the Create tab from the top.
- Go to Creations from the left side.
- Then select the Avatar Items tab.
- Use the Filters and choose Classic Shirts.
- Click on the Upload, it will take you to the Upload Asset page.
- Upload the image, give it a name, add a description, and press Upload.
- The upload option will stay gray if you don’t have 10 Robux.
If you have put the text or picture, be sure to check the ToS before adding it. If it violates the community guidelines, your item might get removed. After it has been approved, you can make your character wear it or use the item for sale to earn some Robux.
That’s all about how to make a shirt in Roblox. For more such guides, you should check our dedicated section. We have covered topics like how to check FPS and turn off the 2-Step Verification.